www.fb.co/DIY.Kreativ

Łączna liczba wyświetleń

sobota, 31 stycznia 2015

Everything's lighter part II. Photos.

Hejsan Svejsan!

I finally finished my livingroom makeover! It's awesome! And I'm in love with this one. 

It was like this:


Booooring...! Dark, hard, no - no! 
P.S. Look at my toddler :D

And now it's like this:


Awesomee! :) Country style :)


I sewed pillow cases from an old bedding :) I bought covers in Ikea (only 9kr/stk)
On the table is floor cover (?!) from my hall, 'cause I had some remains. Aand I used tacker to pin it :)


My awesome pillow case from GIRL:IT, which I got for free with the magazine :)


Awww, thank You pillow, You too! ❤️


And this words pillow case I sewed from a fabric I bought in Ikea just for 5kr :) and this yellow costs just 15kr :)


And I'm so happy with the result :) like usually - visit my instagram for (almost) daily pics (www.instagram.com/byangiebsf) and my facebook for daily updates (www.facebook.com/diy.kreativ) :)
Let the imagination be with You! :)


środa, 28 stycznia 2015

Pimp up your clock! DIY. Ikea Hack.

"Here I am, once again..." Nanana.
Sooo do You have a clock from Ikea, that one with a price 19kr, which is worth more and more than that, because of the DIY potential? No? You have to buy it :D Clocks are a great idea to decorate boring wall, room etc. It work perfect as a gift, espesially if You do it by yourself. 

Sooo let's go!

We want this:


And we've got this:


So, we just need this:
Napkin, glue and a brush for decoupage. "Freeeee Your miiind - the rest will follow" :) You have soooo many options. So be creative! You can make one to every room You have! 


First You need to take of this plastic cover. It has three little things on the sides (I have no idea how to call them) which you have to pop out from the clock. But don't worry it's easy, you don't need any instruction for this one. Later gently take out clock's hands. Watch out - don't loose them, remember where You put them, especially when You have kids :D


Now it's time to cut a layer from a napkin. Take this transparent cover, you just take out of your clock, put it on the napkin and mark around with a pencil. Cut the circle you've got from the napkin. 


Now put napkin to the clock to make a hole in a right place, later decoupage it to the clock. Don't put glue too close to the middle of the clock - keep like 0,5cm free from glue. We don't need to glue this hand's runner :D
Put the hands and the cover on a place, and really - remember to put hands first. Because I forgot and had to take of cover twice :)
Be gentle with a cover - you don't won't to destroy your decoupage work. And - You're awesome! It was 30 mins and You got it :D


If You're happy and You know it - clap your hands :) 
Hope You enjoy this DIY. Ikea we love You!
Please like my fanpage on fb (www.facebook.com/diy.kreativ) and my instagram for (almost) daily pics (www.instagram.com/byangiebsf). 
Let the imagination be with You! See You later ❤️

Everything's lighter! Photo Post

Hi there!
I didn't have so much time for You guys, all because of everything. 
Kids, learning (on my own), watching Harry Potter for a hundredth time, cleaning everything, sewing, and doing the loundry and watching Harry Potter and again loundry and tryin' to be fit and also watching a Harry Potter :)
But I'm here and I decided - I'm gonna spend at least one hour per week on my blog (yaaay! Isn't that fun?) ;)

I thought about my love to strong accents in the interior, and came to one conclusion... We needed to break up :/ I'm changing all red and black details on white, beige, creme etc :) and I have to say - Now we're talking! All is lighter, cleaner - awesome! Here are some pics: 

All of these frames were black. I decided to pimp them up :) with some wrapping paper, teddy-lookalike-fabric, old lace and a white spray paint. 


These were all red, you probably remember those from other posts :) I decorated theme with some plastic pearls and plastic buttons :)


My candle holders (?) became little more soft :) with some lace band and plastic pearls. 


My wooden "LOVE" became ligther with help of an acrylic paint. It supposed to be ombre, and maybe it is, but some parts of my house don't have an acces to the sunlight and it doens't look like it should in a pic. :( sorry boohoo. 


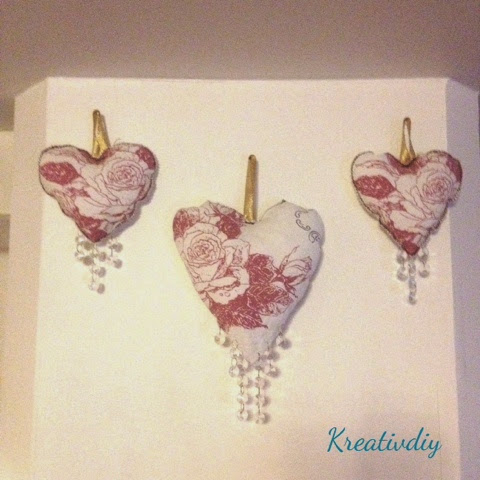
Aaaand my 3 little hearts, which a did by myself from a scratch (sewing machine).
They hanging above the fireplace :)


I don't know if you saw this - but my little homie is a ballerina now :D


Hope You like this post, and You're gonna visit from time to time :) 
You're all welcome to visit my fb fanpage (www.facebook.com/diy.kreativ) and my instagram for (almost) daily pics (www.instagram.com/byangiebsf). 

Let the imagination be with You! :) see You later! :)